Up and running with Python in RStudio
Intro
I enjoy using R for data analysis but recently have been learning Python. My intention is not to move from R to Python, but to be able to work with both R and Python, treating them as complementary tools. This is facilitated by the fact that RStudio has made it easier to work with both Python and R in a single project, using RStudio as a single interface. It’s what they refer to as R & Python: A Data Science Love Story.
In an upcoming post, I will be looking at learning Python from the perspective of an R user. In this post, I describe the nuts and bolts of getting Python up and running in RStudio with the reticulate package. Given that it took me a day or two to set up, I thought this warranted its own post and may be of use to others following the same path.
Getting set up
The objective here is to use RStudio as a Python IDE. We want to set up RStudio so that we can write Python code, add Python libraries, and transition between R and Python when working on a single project.
There appear to be a few ways to do this, and to be honest it took me a while to get it working. But I got there with the approach outlined below.
This approach uses Anaconda. More precisely, it uses a minimal version called Miniconda. The Miniconda installer will give us a version of Python, a package manager called conda, and some other useful packages.
The steps outlined below were partly based on notes provided by Dr Tiffany Timbers as part of an Intro to Reticulate workshop (https://github.com/ttimbers/intro-to-reticulate). The notes below are for Windows and assume you already have RStudio up and running. If you have trouble on the steps below, or need more detail, you may want to check out the material provided by Dr Timbers above.
1 - Download Git Bash
We want to be able to interact with our computer via a command line interface. Rather than using the built-in Windows command line (CMD), we will use Git Bash. To do this we download and install the Git Bash program, which can be found here: https://git-scm.com/download/win
Once downloaded, we can run Git Bash to open the terminal. (To open Git Bash, click on the Start menu and start typing ‘Git’). This is referred to below as “the terminal”.
2 - Use Miniconda to install Python
We need to have a base version of Python installed on our machine. To get this we are going to use Miniconda, which was described above.
Download and run the Miniconda installer which can be found
here. In my case I downloaded the Python 3.8 version, and installed it with the default settings. By default, this should install to a directory like C:/Users/[your name]/miniconda3 .
3 - Integrate Python with the Git Bash terminal
You should now have access to the Anaconda Prompt (to open it, click on the Start menu and start typing ‘Anaconda’).
Rather than controlling our Python installations using the Anaconda Prompt (e.g. when installing new Python packages), we want to be able to do this directly from the Git Bash terminal.
To be able to do this, we open the Anaconda Prompt and type conda init bash.
From now on we will be able to do everything from the Git Bash terminal.
Close the Anaconda Prompt window and any open terminal windows.
4 - Install Python packages
Next we want to install the Python packages that we will be using.
Recall that we will be using the package manager conda, which was downloaded using Miniconda. conda installs Python packages from different online repositories which are called “channels”. We want to add something called the conda-forge channel, which is a community-driven effort to provide the most up to date versions of Python packages.
To add this channel we open the Git Bash terminal and type the following:
conda config --add channels conda-forge
Whenever we want to install Python packages we use the terminal and type:
conda install [package names]
In this case, we want to install NumPy and Pandas, which are some the most widely used Python libraries. To do this we type the following:
conda install numpy=1.* pandas=1.*
You should then be asked if you want to proceed; enter y to do so.
5 - Using Python in RStudio
We are now ready to use Python in RStudio.
To use Python in RStudio we need to do two things:
-
install the reticulate package, which is what we use to translate between Python and R, and
-
point RStudio to the installation of Python that we are using, which in this case is Miniconda Python that we installed above.
The reticulate package can be installed the usual way in R, using
install.packages("reticulate")
The second thing we do is point RStudio to the installation of Python we are using (our Python environment). To do this we use the the function below, where the path is the directory where Miniconda was installed. If you don’t know the path, you can find it by typing which python in a terminal (Git Bash) outside of RStudio. Note the use of \\ instead of \ in the code below.
library(reticulate)
Sys.setenv(RETICULATE_PYTHON = "C:\\Users\\steve\\miniconda3")
By entering the two lines above into your R markdown file you should now be up and running.
Most instructions I have seen actually suggest adding the second line of code to an .Rprofile file in your project’s home directory. This means the environment will be specified whenever you open the project and will not need to be run in each file (e.g. R Markdown document) within the project.
If you do not already have a .Rprofile file, you can create one by opening a text editor, entering the second line of code above, i.e. Sys.setenv(RETICULATE_PYTHON = …), closing the text file, and then renaming the text file to “.Rprofile” (make sure you delete “.txt” from the end). This file should be saved in your project’s home directory. Restart RStudio for the changes to take effect.
6 - Check it’s working
If everything is working you should now be able to write Python code in RStudio. In this section, I am working with an R Markdown (.Rmd) file.
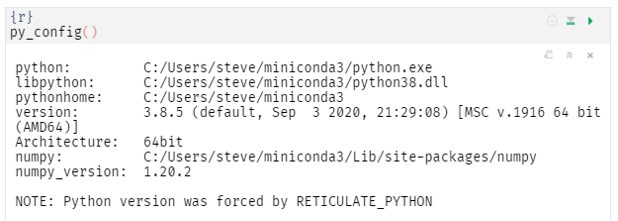
We can check that everything is configured properly by typing in py_config(). This will return a message telling us which Python environment is being used. We should see the words “Python version was forced by RETICULATE_PYTHON”, as shown below.
py_config()
A quick test run
Now let’s check that everything is working by using a simple example that requires the Pandas package.
We will create two data frames in R, one containing the names of three people and their city (data_city), and another containing the names of each city and the corresponding state (data_state):
# R code

data_city <- data.frame(
  name = c("Andy", "Beth", "Carl"),
  city = c("Dallas", "San Francisco", "New York")
)

data_city
##   name          city
## 1 Andy        Dallas
## 2 Beth San Francisco
## 3 Carl      New York
# R code
data_state <- data.frame(
  city = c("Dallas", "San Francisco", "New York"),
  state = c("Texas", "California", "New York")
)

data_state
##            city      state
## 1        Dallas      Texas
## 2 San Francisco California
## 3      New York   New York
Thanks to reticulate, we will now be able to work with these data frames these using Python code.
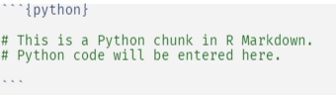
To do this, we use Python chunks in our R Markdown document, i.e. using the header {python} instead of {r}, as illustrated below:
To access the data frames using Python, we add r. before their names. For example, to access the data_city data frame we would use the following:
# Python code

print(r.data_city)
##    name           city
## 0  Andy         Dallas
## 1  Beth  San Francisco
## 2  Carl       New York
Now lets say we want to merge the two data frames above using the Pandas merge function, joining the two data sets based on the city name. The following Python chunk would be run, which creates a Python data frame called data_final:
# Python code

import pandas as pd

data_final = pd.merge(r.data_city, r.data_state, on='city')
print(data_final)
##    name           city       state
## 0  Andy         Dallas       Texas
## 1  Beth  San Francisco  California
## 2  Carl       New York    New York
And that’s it! We’ve successfully configured RStudio to be able to run Python code. We have seen how we can create data frames using R, then access and manipulate these data frames using Python, all in the same R Markdown file. The ability to work across two programming languages (all within RStudio) greatly increases the analytical tools at our disposal.